6 Things You Must Know Before Your Next Hair Appointment
Want better results from your next haircut? These 6 expert-approved hair appointment tips will help you walk out of the salon feeling confident and seen.
Read More
"That view doesn't suck"
Want better results from your next haircut? These 6 expert-approved hair appointment tips will help you walk out of the salon feeling confident and seen.
Read MoreLet’s be real: sometimes your hair is giving away your age more than it needs to. And it’s not your fault—there are a handful of common mistakes that sneak into your routine and silently add years to your look.
Take Stephanie, for example. She emailed me with questions about her medium-length hair, struggling with volume, shape, and that balance between “styled” and “not trying too hard.” The good news? Her concerns are super common—and totally fixable.
In fact, while walking her through a full salon makeover (which you can watch in the video below 👇), I uncovered 5 key mistakes that could be making you look less youthful than you could.

Justin Hickox discussing common hair mistakes with client Stephanie before her haircut transformation for aging hair concerns.
Many people think, “If I keep my hair long, it’ll make my face look slimmer.” Not necessarily.
What actually matters?
The shape of the cut—where you add (or remove) volume, how it frames your face, and where layers are placed.
A longer cut with bulk in the wrong places can actually highlight fullness in the wrong places and drag your face down. On Stephanie, we balanced a soft bob shape with volume through the right areas to elongate her face and add structure—without taking off too much length.

Square, oval, heart-shaped… it’s complicated. And honestly? It doesn’t always matter.
Instead of boxing yourself into a shape, ask:
Do I want to elongate or add fullness to my face?
What features do I want to accentuate (eyes, cheekbones)?
What do I want to draw attention away from or towards?
This approach gave Stephanie (and can give you) way more freedom to customize a cut that suits both your face and your lifestyle.
Stephanie’s vibe? Beachy, tousled, feminine - she didn’t want anything too structured.
That’s doable, but here’s the key:
Beachy = Layered = Some Effort.
If you want that lived-in texture, layers are your friend, but they come with some styling commitment. The payoff? Way more movement, softness, and a youthful finish. We built her cut to be pulled back easily too (a must for outdoorsy gals), so it works and plays well.
Stephanie noticed frizz mostly near her hairline, but the fix isn’t just about that area.
👎 Wrong approach: Fixing only the front
👍 Right approach: Use products and tools consistently throughout to fix the problem as a whole.
My go-to combo for smoothing and control:
Pureology Color Fanatic 21 (heat protectant + leave-in treatment)
Redken Stay High Mousse (volume + hold = control)
Apply root to tip, dry strategically (aiming airflow down the shaft), and use your brush or iron with purpose. That’s how you get shine, polish, and a youthful bounce—without the fluff.
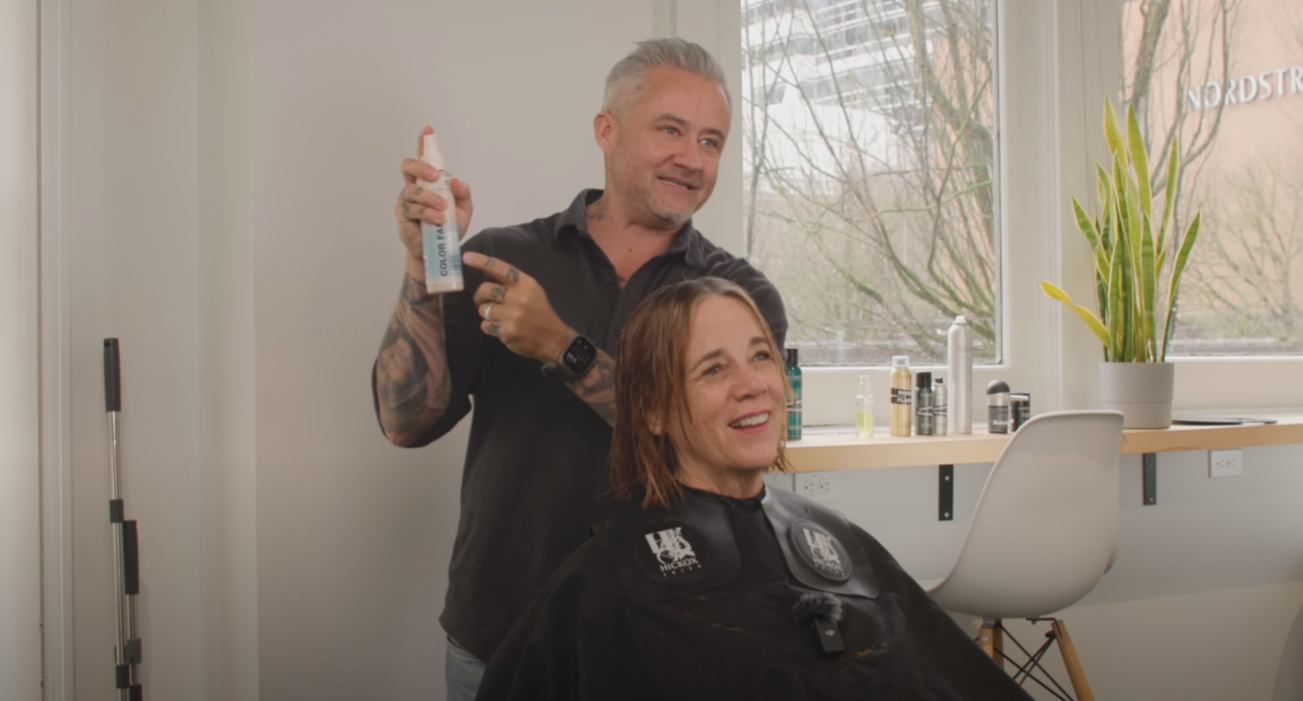
Stylist Justin Hickox demonstrating how to use Pureology Color Fanatic 21 on client Stephanie during her anti-frizz hair transformation.
This one ages your hair because it keeps you stuck in styles you don’t actually love.
Best move: Photos, not just words.
Before your appointment:
Save front/side/back pics of the look you want
List what you like and don’t like (too short? not enough volume?)
Ask how to adapt it to your face shape, texture, and routine
With Stephanie, we landed on a bob that gave her the shape and movement she wanted—but made sure it was still low-fuss enough for Zoom calls and outdoor life.
Watch how we tackled all five mistakes—and the makeover that brought it to life.
Want to feel more confident in your hair again?
Start by addressing just one of these mistakes. You’d be shocked how much younger and fresher you can look with a few small changes.
Which one of these do you struggle with most?
Let me know in the comments—or send this to someone who definitely needs to see it. 😉
If you haven’t already, be sure to subscribe to my newsletter HERE.
Discover which hair volumizing products actually deliver long-lasting, bouncy fullness—and which ones fall flat—so you can finally achieve the thick, voluminous hair of your dreams!
Read MoreStruggling with thinning, dryness, or frizz after 40? Discover expert-backed hair care tips and game-changing products to keep your hair healthy, vibrant, and full of life!
Read MoreTired of battling frizz? We tested the most popular anti-frizz products—discover which ones actually work and which ones aren't worth the hype!
Read MoreStruggling with thinning, frizzy, or brittle hair after 40? Discover the simple yet powerful changes to your routine that can restore shine, strength, and volume—starting today!
Read MoreWhen it comes to hairstyles, particularly for women over 50, long, one-length hair can be stunning. However, it doesn’t always highlight your best features. If you’ve ever wondered why layering can seem so intimidating or how to make it work for you, this guide will provide clarity and confidence. Watch the full video here!
Think of layering as the hair equivalent of tailoring a dress. Just as tailoring accentuates your figure, layering brings out the best in your face shape and hair texture.

One of the biggest fears about layering is ending up with thin, wispy ends. This often happens when layers are overdone at the bottom.
Ask your stylist to keep the hair below the parietal ridge (the area from behind your ear to the occipital bone) as close to one length as possible.
This technique maintains thickness at the ends while still incorporating layers for movement.
No one wants their top layers to resemble a mushroom. This happens when the top layers are too short compared to the overall length.
Use the occipital bone as your guide. Pull a section of hair straight up from this bone and ensure your top layers aren’t shorter than this length.
Communicate clearly with your stylist and demonstrate the desired length using this simple test.

If you’re hesitant about diving into full layering, start with front layers. This approach keeps the back and top of your hair untouched, while the front layers frame your face beautifully.
Front layers grow out seamlessly.
They add shape and movement without committing to a drastic change.
Styled straight, they can blend in with the rest of your hair for a one-length look.

Believe it or not, you can layer your hair at home—especially the front. It might sound daunting, but with the right guidance, it’s easier than you think. Check out my detailed tutorial video for step-by-step instructions: Watch Now!
Long hair can be absolutely beautiful at any age. If you feel amazing with one-length hair, don’t let anyone convince you otherwise. Confidence is the ultimate accessory, and your hairstyle should reflect what makes you feel great.
However, if you’ve struggled with styling or want to try something new, layering could be a game-changer. It’s not about rules; it’s about options and finding what works best for you.

Layering doesn’t have to be intimidating or a one-size-fits-all approach. When done correctly, it can elevate your look and simplify your styling routine. Remember, it’s all about accentuating what you love and feeling fabulous in your own skin.
If you haven’t already, be sure to subscribe to my newsletter HERE.
*This blog contains affiliate links, which means I may earn a small commission if you click through and make a purchase, at no extra cost to you. Thank you for supporting my work!
2025 brings a range of exciting hair trends, but some might not be as universally flattering as they seem. After combing through insights from top sources like Vogue, Glamour, and Cosmopolitan, here’s a breakdown of the most buzzworthy styles, who they’re perfect for, and who might want to avoid them.

Pixie cuts are back, and they’re all about bold designs with extra volume. Popular variations include super-short lengths and hard side parts with longer lengths.

Great for all hair types.
Perfect for highlighting cheekbone structure.
If your hair is very thick, avoid excessive bulk on the sides to prevent an unflattering “dog-ear” effect.
This in-between style combines elements of a French bob and a pixie cut, often with shorter lengths and subtle beveling in the back.

Ideal for medium to fine hair textures.
Works well for those comfortable with frequent trims to maintain the shape.
If you have thick hair and prefer a sleek, one-length look, this style may add too much volume in unwanted areas.
The textured lob (long bob) moves away from chin-length cuts to lengths around the collarbone or longer. This style features layers for added movement.

Medium to thick hair textures with a natural wave are perfect for this look.
It’s great for adding volume and softness to straight or slightly wavy hair.
Fine, straight hair may look wispy with too much layering at the ends.
Pro Tip: Use texturizing sprays or curling tools to enhance the movement. Here are some of my favorites.
The blunt midi is essentially a long bob with no layers. This polished style is known for its clean lines and sharp angles.

Perfect for fine hair that benefits from the blunt ends for a thicker appearance.
If your hair is thick or grows unevenly, maintaining the sharp edges can be high-maintenance.
Inspired by the ‘90s, this style is all about layered, tousled movement. It’s ideal for those looking to create volume and texture.

Thick hair or medium textures with natural movement.
Fine hair can pull this off if the layers are shorter and closer to the neckline.
If your hair is board-straight, achieving the look will require significant effort with styling tools.
While these hair trends are fun and fresh, they’re not one-size-fits-all. Consider your hair texture, face shape, and maintenance preferences before diving in.
Let us know in the comments which trend you’re excited to try and why!
If you haven’t already, be sure to subscribe to my newsletter HERE.
*This blog contains affiliate links, which means I may earn a small commission if you click through and make a purchase, at no extra cost to you. Thank you for supporting my work!
If you’ve been styling your bob but feel like it’s not as flattering as it could be, you’re not alone. From too much volume on the sides to no volume at the roots, common mistakes can take away from this classic cut.
These five simple styling tips will fix these issues and make your bob look more polished and flattering. Best of all, these techniques work on every hair type!
Where and how you part your hair makes a huge difference. A flat middle part can make the sides look overly full, while a well-placed part can add volume at the roots and balance your profile. Either way, you want to be able to control where you part it after it’s dry.
Use a volumizing brush or your fingers to brush your hair in multiple directions while blow-drying.
Flip your hair from side to side to create root lift.
Pro Tip: For more control, use an air modifier with your hairdryer when also using a brush. It allows you to better direct the airflow where you want it to go.

Excess volume at the nape can make your profile look frumpy. By keeping the hair in this area flat, you can lift the overall look and create a sleeker silhouette.
Use a flat or paddle brush to dry the nape area flat against your head.
Avoid applying too much product here to prevent unwanted bulk.

A strong baseline (the bottom of your bob) is key to a polished look. Whether you prefer a flat iron or a round brush, maintaining clean lines ensures your bob stays sharp and flattering.
Use a flat iron for a sleek, straight finish or a larger round brush for a softer look.
Focus on keeping the baseline smooth with minimal bend.
Volume at the temples can dramatically lift your face and make your bob appear more structured.
Take small sections of hair at the temples and lift them towards the ceiling with a round brush while blow-drying.
Use the cold shot feature on your hairdryer to lock in the shape.
Your hair texture plays a big role in how your bob looks. Whether you have fine, thick, or wavy hair, these adjustments ensure a perfect finish:
Fine Hair: Add mousse at the roots for volume only above the temples and keep the nape and sides free of volume adding products and sleek.
Thick Hair: Focus on reducing bulk at the sides and enhancing root lift.
Wavy Hair: Minimize bends at the baseline while enhancing waves at the crown for balanced volume.

Here are the essential tools to perfect your bob styling routine:
Hairdryer: You can find my favorite HERE.
Round Brush: I recommend using a large barrel. You want volume and bend, not curl.
Flat Iron: Great for creating a sleek look and for adding wave.
Mousse: For volume and control.
With these five styling hacks, you’ll transform your bob into a chic, flattering style that highlights your best features. Ready to level up your look? Watch the full tutorial on YouTube here!
If you haven’t already, be sure to subscribe to my newsletter HERE.
*This blog contains affiliate links, which means I may earn a small commission if you click through and make a purchase, at no extra cost to you. Thank you for supporting my work!
As a professional hairstylist with decades of experience, I’ve realized that some of the advice we’ve been giving to clients for years might not be entirely accurate—or even helpful. It’s not that stylists are trying to mislead you; we’re working with the best knowledge available at the time.
But as experts like trichologist Abbey Yung have shown, science and technology evolve. And it’s our responsibility to stay open to new information and adjust our advice accordingly.
So, let’s talk about some common hair care myths, debunk them, and explore what’s really best for your hair health.
For years, the advice has been to avoid daily shampooing to prevent stripping natural oils. The concept of “training” your scalp to produce less oil became trendy.

The truth? A healthy scalp is essential for hair growth, and regular washing is key to maintaining it. A dirty scalp can lead to problems like yeast overgrowth and clogged follicles, which can weaken hair. While not everyone needs to shampoo daily, it’s perfectly fine if your scalp feels best that way.
Takeaway: Forget rigid rules. Pay attention to your scalp's needs. If it feels clean and comfortable with daily washes, go for it! If not, adjust accordingly.
Hair thinning can be frustrating, and the promise of solutions like supplements or topical treatments feels hopeful. But hair loss is often multi-faceted—caused by factors like hormonal shifts, stress, diet, or even physical damage.
The truth? While these products can help in some cases, they’re not magic cures. Identifying the root cause is essential. Overuse of heat styling, tight ponytails, or chemical treatments can cause breakage that no vitamin will fix.
Takeaway: Think holistic. Address internal factors like nutrition and stress while also treating your hair gently. And remember, patience is key with hair growth!
Tip: If you do not like the way topical minoxidil feels in your hair, check out oral minoxidil
Clarifying shampoos have long been seen as a "once-a-week or less" product to strip away product buildup.
The truth? Modern formulations are far more gentle.. Many clarifying shampoos now focus on cleansing without stripping the hair, meaning you can use them more often, depending on your hair type.


Takeaway: If your clarifying shampoo leaves your hair feeling refreshed, not dry, it’s fine to use it regularly. Listen to how your hair feels.
As a stylist, I’ve recommended salon-grade products, believing they offered superior results. However, not all expensive brands justify their price tags. Some drugstore brands deliver similar, or even better, results.
The truth? The line between drugstore and salon-quality products is blurrier than ever. Some affordable options use the same ingredients as high-end lines—minus the fancy marketing.
Takeaway: Research and experiment to find products that work for you, regardless of the price.
Check out some of Abbey Yung's favorite budget-friendly and luxury haircare products HERE.
The belief that heat equals damage has driven many to air-dry exclusively. But while excessive heat can harm hair, air-drying isn’t always ideal either.
The truth? Prolonged dampness puts hair in its most fragile state and can lead to breakage. Studies suggest that blow-drying on low heat from a safe distance can be less damaging than leaving your hair wet for hours.

Takeaway: Strike a balance. Use a low heat setting on your blow dryer, and keep the nozzle moving. This is one of my favorite hairdyers. It has great air flow, plus less heat which means quicker drying time and less damage.
The haircare world is full of myths that have been passed down for decades. By staying informed and open to new ideas, you can develop a routine that works for you—without falling for outdated advice.
Do these myths resonate with you? Have you heard or believed them before? Share your experiences in the comments, and let’s start a conversation about what works for real hair.
If you haven’t already, be sure to subscribe to my newsletter HERE.
*This blog contains affiliate links, which means I may earn a small commission if you click through and make a purchase, at no extra cost to you. Thank you for supporting my work!